5 steps to upgrade your bedroom for better sleep right now

January 25, 2018

1/6

When it comes to getting a solid night’s sleep, you have many tricks up your sleeve. You (try to) stop watching TV an hour before bed, have all of the calming tea, and might even dabble in essential oils (at least your diffuser doubles as table art).

But if you’re still not getting superior sleep, it might not be what you’re doing—but where you’re doing it. Yep, we’re talking about your bedroom. The design of the most important room in your home (they don’t call the bedroom your sanctuary for nothing) can actually affect the quality of your shut-eye.

“Sleep is a performance activity,” says Michael J. Breus, PhD, a clinical pyschologist who’s also known as The Sleep Doctor. “if you have the right equipment you will do it better. Natural talent gets you only so far, and then it’s about the gear.”

“Sleep is a performance activity. Natural talent gets you only so far, and then it’s about the gear.”

He actually compares the art of sleeping to exercise (so maybe it’s time to start getting as serious about your zzz’s as you are about mastering that yoga pose). But how do you know if the gear in your room will give you sweet dreams? Dr. Breus says to just look around and take inventory of your space. “Ask yourself if it’s a place of calmness and tranquility,” he advises. “Or is it a mosh pit of stress and dirty laundry?” 

Luckily, your bedroom redo won’t require you to start from scratch or even enlist the help of a pricey interior designer. These expert-approved swaps might feel small, but they’ll make the biggest difference in your restful rituals. Better sleep and a new room? It’s a win-win situation.

Keep reading for five simple bedroom swaps and tips that’ll make you sleep easy each night.

Get Started

2/6

Your mattress matters

According to Dr. Breus, the items in your bedroom that will affect your sleep the most are your mattress and pillows. “A good pillow and mattress go a long way with sleep,” he says. So if you’ve been laying your head on the same one since college, it might be time for an upgrade.

Spring mattresses with a top foam layer offer you the best of both worlds: They’re sink-right-in comfy on top, but also supportive enough with the spring structure to provide you that firmness (with a bit of bounce). 

SHOP THE ROOM

3/6

Your sheets need a cool factor

“When it comes to bedding, it’s all about temperature control,” Dr. Breus says. “You will always sleep better in the cooler temp.” And no, that doesn’t mean turning off the thermostat at bedtime—but opting for breathable bedding like cotton or dreamy linen (which is also insanely Instagrammable).

SHOP THE ROOM

4/6

Ikea bedroom light

Let there be (some) light…

Being exposed to bright lights has the potential to keep you up longer at night (experts say the blue light many bulbs emit can suppress your body’s natural production of melatonin—AKA the sleep hormone), so it’s a good idea to employ some smart lighting into your room.

IKEA’s dimming kit, for example, allows you to switch to and from cold and warm light, so you can ease into softer lighting as your bedtime approaches. Plus, since you can dim and turn off the lights with a remote control (and even voice assistant), you don’t have to  jump out of bed to darken your room when you’re done reading. 

SHOP THE ROOM

5/6

…but also let there be NO light

Experts says your body rests better in complete darkness (hence why you strive to stay away from the TV), and blackout curtains can help you get there. The window treatments are usually a splurge, but the options from IKEA—everything from rich, velvety curtains to blackout blinds—are budget-friendly and add tonal and textural accents to your overall design. Nope: The thought of overspending doesn’t have to keep you up at night.

SHOP THE ROOM

6/6

Send your phone to sleep, too

You’ve probably been told it’s not wise to sleep next to your phone, but that’s all too easy to ignore. “It gives off radiation when charging so it’s not so great to have it near your head,” Dr. Breus says. “Plus, you do not need the distraction before bed or in the middle of the night.”

Dr. Breus recommends charging your phone in another room. But if just reading that gives you separation  anxiety, simply store it away from your bed. IKEA’s RIGGAD work lamp includes a wireless charging feature, so you can keep it on your desk or dresser and grab it on your way out in the a.m. fully charged.

Plus, you’ll be shocked how streamlined it will feel to keep it simple with just a good book and a glass of water on your night stand. No more anxiety-causing clutter: Just a gorgeous minimalist Instagram pic waiting to happen. 

SHOP THE ROOM

In partnership with IKEA

Photos: IKEA

Let's block ads! (Why?)

https://www.wellandgood.com/good-home/ikea-how-bedroom-design-can-improve-your-sleep/

6 Low-Cost Interior Decorating Ideas

January 22, 2018
  • The attraction and beauty of things do not entirely depend on the price of the things, and some cheap things can also be turned into great ones by proper and effective use. While making a house, failed budgets are nothing new but in such a scenario, ruing over expenditure is no more a solution as there are many ways to compensate for those expenditures. Let us have a look at some low-cost interior decorating ideas for all kinds of home, which can be a great way of reducing the budget and bringing it in within the limits.

    1. Hang plates on the walls!

    This is one of the most innovative ideas which have a minimal cost. You can hang ceramic or other material plates on the wall in different patterns to make it look like some well-crafted idea. You can go for either used ones or you may buy new ones but in either case, the cost is going to be astoundingly low in comparison to any other alternative. So, if you are totally out of budget and looking for the best idea to make your walls look crafty and creative, use plates and hang them on walls to give your house a unique view without any additional special cost.

    2. Paint own canvas and use it!

    Painting a canvas is not only easy, it is one of the most commonly used decoration material in homes and offices. You can use contrasting colors to paint a standard pattern or you may go for your own creative design if you want to experience and try out your creativity. In either case, the canvas is going to cost less and will cut down the interior decoration budget to a large extent. So, use the cheap and standard material which you come across every now and then!

    3. Use your own paintings on the wall!

    Paintings look good on the wall, so does it say whose painting looks good? Any painting which you put on the wall acts as a material of decoration. So, why waste your hard-earned money behind buying paintings of other artists. Use your own paintings to decorate the wall, thus bringing down the cost of decors by a large extent. Also, if someone praises the painting, you can proudly state that the painting is yours. So, use your own painting on the walls.

    4. Try to be natural

    Nature comes to our rescue whenever we are in trouble and things are no different when it comes to strict budget on interior decors. You can use natural things like used wood to make a showcase or use wicker furniture for your dining or living room, thus reducing the cost and giving a refreshing look to the house.

    5. Use fake headboards if needed

    Headboards are not essential for small rooms but when it comes to big bedroom with ample space, headboard becomes a necessity for good look of the room. However, any average headboard with some durability costs a lot, which will not be good for the balance maintenance. So, make fake headboard by drawing image of a beautiful headboard on the wall, such that it looks original when seen from a distance.

    6. Display your collections and choose a family gallery

    One of the best ways to do some cost-cutting with interior designing is to use the collections that you have already made over the years. Every person has some sort of collection, be it dolls, teddies, trophies, stamps or any such thing. All you need to do is arrange them properly and make a safe place to put them on show. Another thing which you can do along with this is making a family gallery comprising of personal as well as group photos of the family members. These two procedures not only save money and help you maintain the budget but also add some personal touch to the interiors of the house. In case you are willing to give the personal touch, you can opt for these alternatives even when you have ample money.

    These are some good and innovative ways in which you can reduce the budget of interior decoration with low-cost decors in your house.

Let's block ads! (Why?)

http://www.tgdaily.com/consumer-tips/6-low-cost-interior-decorating-ideas

കിടപ്പുമുറിക്ക് കിടിലൻ ടിപ് സ്

January 21, 2018

തിരക്കുപിടിച്ച  ജീവിതത്തിൽ മനസമാധാനത്തോടെ കിടന്നുറങ്ങാൻ കഴിഞ്ഞില്ലെങ്കിൽ പിന്നെന്ത് ജീവിതം. ഇവിടെയാണ് കിടപ്പുമുറികൾ മനസിന് ഉന്മേഷം നൽകുന്ന രീതിയിൽ ഒരുക്കേണ്ടതി​​െൻറ ആവശ്യകത. 

മുൻകാലങ്ങളിൽ കിടപ്പുമുറിയോടു ചേർന്ന് ഒരു ഡ്രസ്സിംഗ്  ഏരിയകൂടി ഒരുക്കാറുണ്ടായിരുന്നു. ഏരിയ ചുരുക്കുന്നതി​​െൻറ ഭാഗമായി ഡ്രസ്സിംഗ് റൂം പലരും ഒഴിവാക്കി അതിനുള്ള സൗകര്യം കിടപ്പുമുറിയിൽതന്നെ ഡിസൈൻ ചെയ്യുന്നു. കിടപ്പുമുറി ഡിസൈൻ ചെയ്യുമ്പോൾ കയറി വരുന്ന സ്​ഥലം ചെറിയ ഒരു പാസേജ്  ചെയ്ത് അവിടെ നിന്നും ടോയ്ലെറ്റ് അറ്റാച്ഡ് ചെയ്താൽ ബെഡ്റൂം മുഴുവൻ നല്ല രീതിയിൽ ഉപയോഗിക്കാൻ പറ്റും. അല്ലാത്തപക്ഷം ടോയ്​ലറ്റിലേക്ക് പോകാൻ വേണ്ടിവരുന്ന േക്രാസിംഗ് ബെഡിെൻ്റ സൗകര്യം നഷ്​ടപ്പെടുത്തുന്നു. 

Bedroom1

കട്ടിൽ മധ്യഭാഗത്ത് ഇട്ട് ഇരുവശത്തും ഓരോ സൈഡ്ബോക്സ്​ വെക്കുകയും നല്ല സൗകര്യത്തിൽ അലമാരയും ഡ്രസ്സിംഗ് മിററും വെച്ചാൽ ഒരു ബെഡ്റൂം ആയി. കട്ടിലിന് നേരെ എതിർവശത്ത് ഒരു എൽ.ഇ.ഡി. ടിവിക്ക് സൗകര്യം ഒരുക്കാം. 
ബെഡ്റൂമിൽ ടിവി വേണ്ടെന്ന് ചിലർ പറയാറുണ്ട്. എന്നാൽ അസുഖം വന്ന് കിടപ്പിലാകുമ്പോഴും പുറത്തെ ക്യാമറ കാഴ്ചകൾ കാണാനും  ഇത് ഉപകരിക്കും. 

Bedroom2

കട്ടിലിന് പുറകിലായി ഒരിക്കലും ജനൽ വരാതെ നോക്കണം. ഇത് ഒറ്റ പൊളി ജനലാക്കി കട്ടിലിെൻ്റ രണ്ടുവശത്തേക്കും മാറ്റി നിർമിച്ചാൽ ഹെഡ്റെസ്റ്റ് നന്നാകും. കട്ടിലി​​െൻറ നടുവിൽ ജനലുകൾക്കിടയിൽ ഒഴിച്ചിട്ട സ്​ഥലത്ത് ഒരു പെയ്ൻ്റിംഗ് വെക്കാവുന്നതാണ്.

ബെഡ്റൂമിൽ നിന്ന് ബാൽക്കണി വേണമെന്ന് ആവശ്യപ്പെടുന്നവർ ഒരു കാര്യം പ്രത്യേകം ശ്രദ്ധിക്കണം. ബെഡ്റൂമിനുള്ളിലെ ഫർണിച്ചറുകൾക്കും വെൻ്റിലേഷനും തടസം ആകാത്ത രീതിയിൽ ബാൽക്കണി ഒരുക്കാൻ ശ്രദ്ധിക്കണം. 

ഫ്ലാറ്റ് റൂഫ് ആണെങ്കിൽ ബെഡ്റൂം സീലിംഗ് ചുമരുകളോട് ചേർന്ന് രണ്ട് അടി വീതിയിൽ ജിപ്സം ബോർഡ് ചെയ്തു കോവ് ലൈറ്റ് കൊടുത്താൽ അൽപ്പം ആർഭാടം തോന്നിക്കും.  ഒന്നാം നിലയിലെ ബെഡ് റൂമിൽ സ്ലോപ് റൂഫ് കോണുകൾ അസ്ഥാനത്തു ആണെങ്കിൽ സീലിംഗ്​ ആവശ്യമായി വരും. ഇത്തരം സീലിംഗ് വർക്കുകൾ റൂമിന് പ്രത്യേക ഭംഗി നൽകും.  

bedding

കിടപ്പുമുറിയിൽ വെളിച്ച വിതാനത്തിനും പ്രാധാന്യമുണ്ട്​. വാള്‍ വാഷിങ് ലൈറ്റും സീലിങ്ങിലെ ലൈറ്റിങ്ങുമാണ് മുറികള്‍ക്ക് അലങ്കാരമാവുക. എന്നാല്‍ നമ്മുടെ ആവശ്യങ്ങള്‍ മനസിലാക്കി ലൈറ്റ് കൊടുക്കാന്‍ ശ്രദ്ധിക്കണം. കിടപ്പുമുറിയില്‍  സ്റ്റഡി ടേബിള്‍ ഇടേണ്ടിവരുകയാണെങ്കില്‍ അവിടെ ലൈറ്റ് വേണം.

കിടപ്പുമുറിയില്‍ ബെഡ്ഷീറ്റ്, ക്വില്‍റ്റ്, കുഷനുകള്‍, കര്‍ട്ടന്‍ ഇവയിലൂടെ മുറി നിറപ്പകിട്ടാര്‍ന്നതാക്കാം.

Let's block ads! (Why?)

http://www.madhyamam.com/griham/column/home-making-bedroom-design-tips-griham/2018/jan/21/417114

Decorating ideas when you're on a budget

January 20, 2018
Femina

If you have big dreams for your home but a small budget, you’ve come to the right place. We’ll give you five ideas to start you on your journey to a better looking home, but remember, home improvement is a life-long plan. Once you have a theme in place, you can slowly add elements to achieve the look, over time.

Femina

Floor rugs: One of the quickest ways to get a room looking different is to add or change a floor rug. If you don’t have one and decide to add a floor rug to your room, it can immediately give the room a cosy and comfortable look. If you change a rug, the colours can bring a different mood to your room.

Femina

Mirror: Giving your mirror a new frame, a vintage frame, can immediately amp up the mood of your room. With a beautiful new frame, you could give your mirror a new place, probably above a console table and make it an attractive corner.

Femina

Lampshade: Lamps are a great addition to a room and can look beautiful even when they’re not lit. But sometimes, when they’ve been in the same place and have worn the same lamp shade, they can get lost in a room. Renew a lamp’s glow by changing the lampshade. If the old shade still looks good, add a tassel trim.

Femina

Curtains: This is a no brainer and sometimes, you may be able to get curtains for a steal. If it’s summer, try sheer curtains in candy colours, with pretty floral prints. If winter in coming, look for thicker curtain fabrics, with a bit of sheen and trims for a luxe look.

Femina

Collectibles: A rearrangement of your collectibles can give you home a new look. Stack hard bound books on a table and a potted succulent on top of it or arrange a bronze statue with a flower vase next to it. Shells, photos and curios are ideal to place on coffee tables and console tables.

Let's block ads! (Why?)

https://www.femina.in/life/decor/decorating-ideas-when-youre-on-a-budget-75671.html

Judge sides with Bridgewater on Joshua Heights project

January 19, 2018

BRIDGEWATER — A plan to build affordable housing on Main Street North — in the works for the last 20 years —hit another roadblock this month when a state judge declined to enforce his own 2003 ruling.

In an eight-page decision, Judge Trial Referee William Mottolese agreed with the town’s Planning and Zoning Commission that the project, which started out as a 35-unit development and would now have 100 apartments instead, had changed too much to be considered the same one he ordered the town to accept 15 years ago.

Mottolese ordered in 2003 that the town had to allow developer John Carr to build the Joshua Heights affordable housing development on a rocky patch of land on Main Street North if the developer met “reasonable conditions” and obtained approval from the state Department of Energy and Environmental Protection.

That decision was upheld in the state Supreme Court two years later.

But, last year, the town denied Carr’s plans, despite the fact that he had received DEEP permits for an underground waste water treatment system in the spring. In October, Carr filed a motion for the court to find Bridgewater in contempt.

The zoning commission argued that it denied a vastly larger project, not the one Mottolese said they must accept. Mottolese agreed in his Jan. 10 decision, pointing out that his order was for a 35-unit project with 172 bedrooms on 16 acres of land.

Carr now plans a 100-unit, 260-bedroom design on 24 acres.

First Selectman Curtis Read, who has cited environmental concerns for his opposition to the project, said he was happy with the judge’s “definitive decision.”

Carr, in an interview, said he was disappointed with the ruling and wished the judge had considered the reasons the project was bigger, instead of ruling that its scale made it a different project entirely.

Carr contends that the project is only larger because more units are necessary to pay for the waste-treatment system DEEP approved.

“It is different, but it’s different because of what (Mottolese) ordered,” he said. “I didn’t choose this. In my mind, I just complied with what the judge wanted.”

Carr said he still sees avenues to get the project built, although he’s uncertain about his legal options. “It’s far from dead,” he said. “It’s a matter of how we move forward.”

Read estimates that legal fights with Carr for the past two years have cost the town between $15,000 and $20,000.

“It has taken a lot of resources and time to see if the judge agreed with us,” he said.

blytton@hearstmediact.com; 203-731-3411; @bglytton

Let's block ads! (Why?)

https://www.newstimes.com/local/article/Judge-sides-with-Bridgewater-on-Joshua-Heights-12511137.php

The Rabbit Hole carries eclectic selection of items, collectibles on West Side

January 17, 2018

Named from “Alice’s Adventures in Wonderland,” The Rabbit Hole is a fanciful emporium of unique gift and decorating ideas.

Located at 1318 Bigley Ave., beside the Bigley Avenue Barber Shop and a hop, skip and jump from the Bigley Piggly Wiggly supermarket and Bigley Avenue on Charleston’s West Side, The Rabbit Hole opened for business approximately six months ago.

Owner/proprietor Jessica Lilly of Sissonville said she had worked at a nail salon farther down Bigley Avenue until she was told of the vacant building where The Rabbit Hole now stands.

“I was doing nails down the road at Tabitha’s Salon,” Lilly recounted last week. “My friend from junior high was one of the barbers next door here. I was on Facebook one night ... I hadn’t talked to him for a while, but I saw his light on on Facebook. We started talking.

“I’d been looking for a place to do this. I like to work for myself. I like doing the T-shirt-making thing and sign making. I’ve also collected knives, so we have a knife section. The concealed-carry purses — I’ve always been into that. Body jewelry, I started selling that when I started doing nails. I was just looking for a little place to put a this-and-that store. My friend said, ‘We have half a shop over here,’ so, within a month, we opened up.”

Lilly said she has met several local artists since launching The Rabbit Hole, and she features some of their work in her shop. The inventory, she said, is largely “whatever I can find, wherever I can find it. Most of my glass comes from suppliers out West. The purses come from somewhere in Texas. But there are a bunch of artists from around here who want to put their stuff up here. I have a guy who’s making hemp bracelets.”

Customer response and sales have been favorable so far, she said.

“There’s such a big supply and demand here that I can’t keep up with it. I had a whole case of body jewelry about a month ago, and it’s down to a table. I don’t have time to make any more orders right now,” Lilly said.

As for her personal tastes, she said, “I just like unique and different. Like the Jack Daniel’s bottle lamps. They’re so cool. A guy down the road came here with those.

“I like the kind of reused stuff.”

The Rabbit Hole is located at 1318 Bigley Ave. in Charleston. Hours of operation are 2 to 8 p.m. Mondays through Thursdays and from 11 a.m. onward on Fridays and Saturdays. Lilly said she keeps flexible closing times because of a habit she shares with “Alice in Wonderland”’s pressed-for-time and often harried March Hare.

“’I’m late, I’m late, I’m always late,’” Lilly said, laughing. “That is why The Rabbit Hole came to be, really. Everybody was saying to me, ‘You’re always late,’ and I’m like, ‘I know. I got stuck in the Rabbit Hole.’

“My friends or other people will come in,” she said, “and we’ll start talking and it’ll be two hours later and they’ll say, ‘Man, I’ve been here for two hours!’ The Rabbit Hole just kind of sucks you in.

“I usually close at 8. Sometimes I’m open until midnight or 1. It just depends on who’s coming in, how cold it is. If it’s not real cold, there’s a lot of foot traffic coming in from the street. People will stop in and say, ‘Hey, what’s in here?’”

For further information, contact The Rabbit Hole at 304-590-4876.

Let's block ads! (Why?)

https://www.wvgazettemail.com/the-rabbit-hole-carries-eclectic-selection-of-items-collectibles-on/article_63070508-cb3c-56f3-bc26-754d01be4ca1.html

Living With Style: Decorating Ideas for the New Year

January 15, 2018

The beginning of a new year is often a time for brainstorming ways we’d like to improve our lives and our homes over the new year.  Here are a few things to consider if you are considering simple ways to upgrade your experience of home.

Repaint the Entry

Don’t want to take on adding new color thru ought the home this year, but want to create a new experience?  Consider repainting at least one wall of your entry in a new color that plays nicely with the existing colors in your home.  This works best if you have a symmetrical wall at the entry not broken up by doors into other spaces.

+6 
Living With Style: Eating Corner

Adding an eating corner to your kitchen is a fun way to give you and your family another cozy place to hang out together.

Include Artwork

One new piece of art in a prominent location can change the way we see and experience our space.  Even just rotating existing pieces of art to new locations can help us to see them again in a fresh new way.

Creating a designated Eating Area 

+6 
Living With Style: Kitchen Backsplash

Changing out the backsplash can bring new life to kitchen spaces.

Create a cozy place to eat and chat by installing a built-in banquette or add a small table with chairs.  I have a small antique table at the center of my kitchen with a couple of small bistro chairs — and that table gets used and enjoyed more than any other table in the house.

Change the Kitchen Backsplash

There are so many fabulous mosaic tiles available today, and a mosaic tile backsplash is a perfect place to splurge on an updated look.  The tile quantity will be less than you would use in nearly any other application in your home, making this is a wonderful place to splurge.

Enhance with Lighting

+6 
Living With Style: Bathroom Lighting

Sconces added to a bath bring both beauty and practicality to your time spent there.

If you don’t have under cabinet lighting installed in your kitchen yet, you will be amazed at the difference it will make for the space. Your room will lighten up and feel larger — and it will be easier to chop those carrots!

Another easy light upgrade is found in your bathroom. Change out your wall fixtures and you can really change the look and the feel of the space.

Refresh the Bedding

+6 
Living With Style: New Bedding

New bedding is a simple way to refresh the room. This is where your day starts, after all!

Don’t want to replace your bedding this year, but want to improve the feel of your bedroom?  Designers have samples from our favorite bedding lines that can bring to your home so that you can see them in your space. 

Another option is to take existing pillows and fabrics with you when shopping. This will help you match new bedding with your current fabrics to see if it's a fit before you bring it home.

Create a Focal Point

Add a bold ceramic centerpiece to your dining room table or buffet in a color that contrasts nicely with your walls and table top.  Every time you step into the space you’ll experience a new visual inspiration.

Or consider making the focal point new buffet lamps with colored or interesting shades.  This will add style and light!

Update the Fireplace

Whether you're playing up an original historic look or modernizing a 1980’s fireplace, consider restoring — or adding — new tile and color.  Anyone fortunate enough to have a fireplace (so many of them came down in the 1933 earthquake here in Long Beach) should take advantage of the opportunity to create a wonderful focal point that speaks of warmth and soft light.

Add Area Rugs

Already have the furniture you love, but somehow the space still doesn’t feel finished? 

The right area rug will pull together the space and add comfort and color.  Designers can bring samples from the rug lines they carry to your home to experience with your other paint and upholstery finishes.

Or, if you are doing the shopping yourself, be sure to take swatches of your paint colors and existing fabrics with you. This ensures that the rug will be the one to pull all of your elements together.

Upgrade Windows

+6 
Living With Style: Window Treatments

Is your room missing something? Window treatments can add balance to any room.

Already have blinds, but the room still feels harsh?  Consider adding drapery panels to frame the blinds, or consider adding a fabric valance at the top of the window and its blind. 

A good rule is to make sure that we incorporate both soft elements and hard ones.  For example, in a home office that contains mostly wood and metal finishes, wood blinds alone at the windows may give you privacy — but it won't enhance the feel of the space. 

Add a fabric valance  — and perhaps an upholstered guest chair — and an area rug and poof: Balance!

Consider Your View

+6 
Living With Style: Window Treatments 2

No matter how small the space you look out upon thru your windows, the view can always be enhanced in ways that open up your space. 

If the space is tight, for instance, looking out of a window at the side of a home towards a wall in close proximity, the addition of a single spot light and a sculptural element framed by a small amount of greenery can make the view pop day and night!

Add Life

+6 
Living With Style: Plants

The simple addition of fresh flowers in a room brings life and beauty to the space.

I admire people who manage to bring in arrangements of fresh flowers into their homes every week.  Wow!  That would be fabulous! 

Instead, I add low maintenance house plants to my rooms in interesting pots and then very small floral arrangements from my garden in petite mini-vases.  Living beauty and low maintenance – that works for me!!

I hope this gives you a few ideas for how to make your home sparkle and come to life for you in new ways in 2018. Cheers!

Sasha Witte can be reached at  www.SashaWitteDesign.com or (562) 434-8824. 

Let's block ads! (Why?)

http://www.gazettes.com/entertainment/living-with-style-decorating-ideas-for-the-new-year/article_583cd1de-f595-11e7-84c0-4baff194dae6.html

Around the home: New year, new decorating ideas

January 14, 2018

Now that the holidays are over and all the decorations have been taken down and stored away, you may be looking around your home or office and thinking that you would like to do something to change and freshen it up.

Recently, the Wichita Falls Alliance for Arts and Culture expanded their offices and Director Margie Reese asked me to help decorate the new space.  We decided to utilize some unusual and unique items and I thought I would share some of these ideas, along with the techniques to execute them.

Giant Wall Clock

Materials needed:

12 pictures or items

12 canvases, frames or picture holders

Appropriate sized clock mechanism (available at your local craft store)

Paint color of your choice (optional)

Adhesive numbers (optional)

Wall clocks are a necessity in a home or office.  Some are very utilitarian, some are very decorative, but let’s face it, they are all pretty standard, as far as clocks go.  With a few simple steps, you can create your own custom clock, designed to your specifications and personalized for your family or business.

Step 1:  This clock was going on the wall opposite a desk. A rectangle, the same size as the desk facing it, was taped off and painted on the wall using two coats of acrylic primer and two coats of white satin interior paint. If you like your wall color or are not allowed to paint, skip this step.

Step 2:  For the numbers, I used 12 postcards depicting the Alliance’s “Don’t Fence Me In” community art project.  I purchased 12 4x6” canvases and spray painted them all black.  Once they were dry, I used spray adhesive and attached my postcards, off center, to the canvases.


Here, you can use just about anything you want.  Family photos in frames, vacation photos, Grandmother’s recipe cards, wine bottle labels ... literally anything.

Step 3:  Arrange your “numbers” in a circle and hang your clock mechanism in the middle.

I left room around the edges so the Teaching Artists who participated in the project could sign their names to the clock, thereby making it extremely special and personal.


Sculpture Wall

Materials needed:

Multiple pieces of art in the same size

Craft paper

Masking or painter’s tape

Pencil

Hammer

Picture hangers

Art on a wall doesn’t have to be a painting, a photo or a tapestry.  Something like metal sculptures in shadowboxes, hung in multiple numbers, is unusual, unexpected and creates a stunning visual.  But hanging multiple items uniformly and evenly spaced can be difficult and frustrating.  Here is a quick and easy remedy for hanging these items easily and stress free.

Step 1:  On the floor, roll out craft paper to the desired width of your finished wall display, taping together pieces to make the height longer, if necessary.  Arrange your items on the paper in the configuration you want and using the pencil, mark where the hangers are located.

Step 2:  Place the paper template in the desired position on the wall and affix with tape.  Align your picture hangers with the marks on the paper and using your hammer, nail through the paper into your wall.  When all hangers have been applied, gently tear away the paper and hang your art.  Your end result will be a perfectly spaced and evenly hung art display. 


Non-Traditional Art

Almost anything can become art on your walls.  Driftwood found on a beach, a piece of an old fence or gate or even a beloved children’s game.  To that end, a collection of old, electric guitars were hung on two walls at The Alliance’s offices and instantly became a surprising conversation piece. Easy as could be, but so impressive.

I hope that these few ideas have sparked your creativity and encouraged you to think outside the box when considering items to use in your home and/or office décor.  Use your imagination and give it a try!

Happy decorating!

Wichitan Chip Kouri — who recently participated as a teaching artist in the Wichita Falls Alliance for Arts and Culture that gave us the Don't Fence Me In project, as well as starring in "Sister Act" and "The Wizard of Oz" at The Wichita Theatre — takes us along as he creates some of his home, gardening and entertaining favorites.   


Read or Share this story: http://wtrne.ws/2Ddu4E2

Let's block ads! (Why?)

http://www.timesrecordnews.com/story/life/2018/01/14/around-home-new-year-new-decorating-ideas/1032844001/

Wasserman home has 'little bit of everything'

January 14, 2018

“I think the eclectic pulls everything together,” the 2002 Monroeville High School graduate said. “We have a little bit of everything.”

Years of planning have resulted in the home of Tyler and Jessica Wasserman catching the attention of a national magazine, Flea Market Home & Living. The 12-page article features their four-bedroom Ridgefield Township home and LynMarie’s Coffee, which Jessica Wasserman and her sister have run since November 2008.

Wasserman found many of the unique items in her house at garage sales or online. The kitchen features a 1920s cast-iron Kohler sink with that she found on eBay. The sink, which was already refurbished, is under a large window.

“I wanted it to have a lot of natural light,” Wasserman said, referring to the kitchen. “It was pretty much designed around that sink.”

The kitchen is part of what is essentially a grand room. The area includes a living room nook with a television, an eating nook, dining room and large windows.

Cathedral ceilings found in many modern homes don’t appeal to Wasserman, whose undergraduate degree is in early childhood education.

Wasserman, her husband and father, Ken Schafer, took about a year to create the house plans. About two years later, the Wassermans moved into the house which sits on family property. Schafer is a retired architect who worked for Janotta & Herner.

“We wanted a home large enough for our growing family, but small and coxy enough to grow old in,” Wasserman said in the magazine. “Our entire home is one huge DIY project.”

The house truly is a family project. For example, Tyler Wasserman and his father-in-law built the kitchen cabinets.

Jessica Wasserman praised her husband for supporting her decorating ideas.

“He’s my No. 1 fan,” she said. “I met my husband in college and dragged him here to old Monroeville.”

Her husband has put in a lot of hours into the couple’s finds. 

The fireplace “surround” is made of white tiger oak, but it initially was covered by seven layers of paint. The couple bought it from Old School Warehouse in Monroeville.

“They ‘picked’ it from a mansion in Cleveland,” Wasserman said. “My husband spent about a week carefully peeling off the paint.”

In front of the fireplace is the lengthy dining room table, which Wasserman discovered on the Huron County Online Garage Sale on Facebook. It was being stored in a woman’s barn.

“I paid $100 for it,” said Wasserman, whose husband picked up the table an hour after it was posted for sale. “It’s a harvest dining room table.”

Hanging above the table is a chandelier, which Wasserman bought for $75 on craigslist. It had been in a home in downtown Sandusky.

“I added (more) crystals to it that I found in a yard sale,” Wasserman said. “I cleaned all the crystals. I used every little bit; I think I have five left.

“They all seem to go together,” she added.

The house has a wide front porch and a walk-out basement. Wasserman said the plan is for the basement to resemble an English pub, but still be a place where her husband can watch football.

“I want it to feel like it does up here,” she said. 

It was Wasserman’s Instagram account (@jesswasserman) that caught the attention of the Flea Market Home & Living editor-in-chief, Lisa Marie Hart. Wasserman has about 33,500 followers.

“She emailed me through my coffee shop,” said Wasserman, whose Instagram account features her house and decorating ideas.  

Hart interviewed Wasserman twice by phone, in late August and September, and asked her about her favorite room and piece of furniture plus some technical questions. Then the editor had Wasserman take photographs. The rural Monroeville woman sent Hart 30 to 40 pictures.

“After I took them, they said they were pretty good,” said Wasserman, so the magazine didn’t need to send a photographer. “I wanted to talk about everything. I wanted to tell her so many stories.”

Calling the house “our forever home,” Wasserman said she wants people to know they don’t have to spend a lot of money to make their houses look nice.

Let's block ads! (Why?)

http://www.norwalkreflector.com/Home-Garden/2018/01/14/Wasserman-home-has-little-bit-of-everything.html?ci=stream&lp=1&p=

This Simple Mirror DIY Will Upgrade Any Boring Wall in Your Home

January 12, 2018

Grab some rope and get to work!

More From DIY Decorating Ideas
20 articles
diy rope star mirror
Advertisement - Continue Reading Below

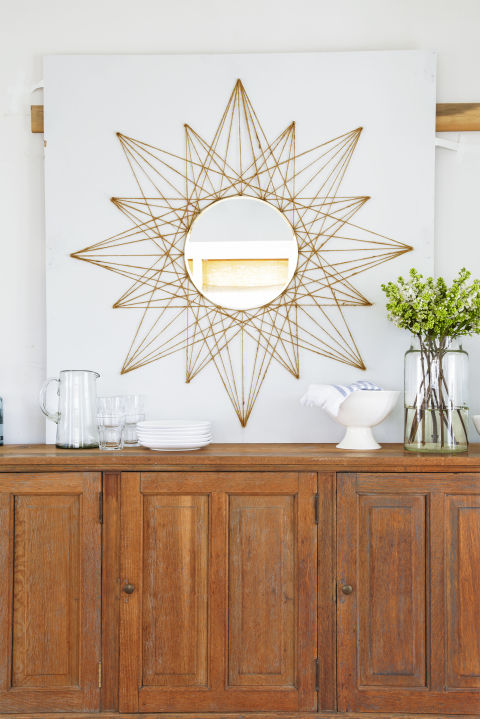
Adding a DIY project into the mix can give your store-bought decor new life and dress up your home on a budget. Follow these quick and easy steps courtesy of CountryLiving.com to learn how to make a stunning star mirror that look expensive, but costs less than $25.

What you'll need:

•1 spool of jute twine ($5, amazon.com)

• 14 inch round mirror ($8, michaels.com)

• Painter's tape ($4, amazon.com)

More From DIY Decorating Ideas
20 articles

• Nails ($7, amazon.com)

Step 1: Trace and Number

Trace the circumference of the mirror in pencil on the wall where you want it to hang, then mark the center. Divide the circle into 16 equal sections, marking a point where each line meets the circle. Mark off each point with numbered pieces of painter's tape (numbered 1-16), starting with 1 at the top center and continuing in numerical order, moving in a clockwise direction.

Step 2: Tape and Nail

At point 1, measure a 16-inch vertical line outward, using a yardstick for guidance, and mark the end with a point. Move to point 2, measure a 12-inch line, and mark the end. Continue for each circle point, alternating between 16 and 12 inches. Mark outer points with numbered pieces of painter's tape (numbered 17-32), with 17 at the top center and then continuing in numerical order, moving in a clockwise direction. Hammer nails into all points.

Step 3: Wrap Twine

Using the following guide, wrap the twine around the nails, beginning with a knot at the starting nail and ending with a knot and cutting the twine at the last nail. Start at nail 25, wrap around nails 11, 29, 15, 17, 3, 21, and 7, ending at 25. Start at nail 26, wrap the twine around nails 12, 30, 16, 18, 4, 22, and 8, ending at 26. Start at nail 27, wrap the twine around nails 13, 31, 1, 19, 5, 23, and 9, ending at 27. Start at nail 28, wrap the twine around nails 14, 32, 2, 20, 6, 24, 10, ending at 28.

Step 4: Wrap Twine (Again)

Next, start at nail 25 and wrap the twine around nails 9, 26, 10, 27, and 11. Continue this pattern, alternating between the inner and outer nails in a clockwise direction, until you make it back to 25. Without cutting the twine, skip nail 9 and wrap it around nails 10, 26, 11, and 27, continuing the same alternating pattern until you make it back to nail 10. Finally, moving clockwise, wrap the twine around each inner nail in a clockwise direction until the circle is complete at nail 9.

Step 5: Hang Mirror

Apply two large picture hanging strips on the back of the mirror and adhere the mirror to the wall following package instructions.

Styling by Carla Gonzalez-Hart; Crafting by Andrea Greco

This article was originally published in the February 2018 issue of Good Housekeeping.

From: Country Living

Watch Next:

More from Good Housekeeping:

Let's block ads! (Why?)

http://www.goodhousekeeping.com/home/decorating-ideas/a47625/diy-rope-star-mirror/